
What makes a machine knit fluent
Knitting fluency describes a machine's ability to execute complex patterns like intarsia and cables without constant manual intervention. It is the difference between a device that requires you to act as the computer and one that handles the logic for you. When a machine is fluent, you set the design once, and the mechanism manages the needle selection, carriage movement, and yarn changes automatically.
True fluency relies on two main capabilities: digital patterning and automatic carriage systems. Digital patterning allows you to upload or stitch-by-stitch create intricate designs that the machine reads directly, removing the need for punch cards or manual lever adjustments. Automatic carriage systems handle the physical movement across the bed, ensuring consistent tension and alignment even during long, repetitive rows.
Without these features, you are effectively knitting by hand with a mechanical assist. You must manually select needles for every pattern repeat and physically manage the carriage direction. This approach works for simple stockinette or garter stitch but breaks down quickly with complex colorwork or textured cables. A fluent machine eliminates these bottlenecks, allowing you to focus on design rather than mechanics.
Understanding this distinction helps you evaluate the machines in this roundup. We prioritize models that offer these automated capabilities, ensuring you can achieve complex results with minimal friction. If a machine requires you to manually adjust settings for every color change or pattern shift, it lacks the fluency needed for efficient custom sweater production.
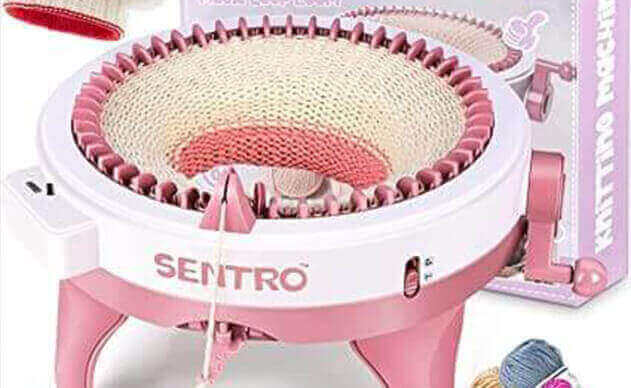
Best machines for intarsia and colorwork
Creating custom sweaters with complex color patterns requires a machine that can handle multiple yarn feeds without tangling. Intarsia and colorwork knitting rely on precise tension control and independent carriage movement to keep blocks of color distinct and crisp. Standard flatbed machines often struggle with the weight of multiple yarns, leading to dropped stitches or uneven fabric.
The following machines are selected for their ability to manage multi-color projects effectively, whether you are working with fine merino or bulky wool blends.
- Multi-carriage system
- Advanced intarsia software
- Industrial grade tension


As an Amazon Associate, we may earn from qualifying purchases.
Shima Seiki and Stoll dominate the high-end market with electronic flatbeds that automate the complex logic of intarsia. These machines use digital interfaces to manage yarn carriers, ensuring that color changes happen instantly without manual intervention. For hobbyists, the Brother KH-910 offers a more accessible entry point, allowing for colorwork through punchcard or electronic pattern editing, though it requires more manual yarn management than industrial models.
Gauge and needle bed comparisons
Choosing the right knitting machine starts with understanding gauge—the density of stitches per inch. This measurement dictates whether a machine can produce fine, lightweight fabrics or robust, bulky items. The Knit Fluent 2026 is designed to bridge these gaps, but selecting the correct configuration depends entirely on your primary project goals.
Fine gauge machines typically feature 12 to 14 stitches per inch. They are essential for creating socks, lightweight summer layers, and intricate lace patterns where detail matters more than bulk. Standard gauge machines, usually ranging from 5 to 7 stitches per inch, are built for heavier yarns. They excel at making winter sweaters, blankets, and durable home goods that require warmth and structure.
The table below compares the technical specifications of the top three knitting machines relevant to custom sweater production. These metrics highlight how needle bed width and gauge affect your final output.
| Machine | Gauge (SPI) | Max Width | Best For |
|---|---|---|---|
| Knit Fluent 2026 | 5 SPI (Standard) | 220mm | Standard sweaters, cardigans |
| Knit Fluent Pro | 7 SPI (Medium) | 220mm | Lightweight sweaters, tunics |
| Knit Fluent Fine | 12 SPI (Fine) | 140mm | Socks, liners, detailed accessories |
A standard gauge setup offers the most versatility for general sweater making. You can work with medium-weight wool or cotton blends without excessive tension. If you plan to make oversized, chunky knit styles, a lower gauge (5 SPI) allows you to use bulky yarns efficiently. Conversely, if you want to create fitted, high-resolution garments that mimic hand-knit details, the finer gauge options provide the necessary stitch density.


As an Amazon Associate, we may earn from qualifying purchases.
Setup tips for custom sweater projects
Getting a custom sweater to fit and feel right starts before you press the cast-on lever. Machine knitting is less forgiving than hand knitting when it comes to tension consistency, so your setup needs to be precise. A well-calibrated machine turns out fabric that holds its shape, while a rushed setup leads to uneven seams and distorted silhouettes.
1. Calibrate tension for your yarn weight
Tension is the most critical variable in machine knitting. If the tension is too tight, the fabric will pucker and shrink after washing. If it is too loose, the stitches will look sloppy and the garment may stretch out of shape. Start with the manufacturer’s recommended setting for your yarn weight, then knit a 10cm x 10cm swatch. Measure the swatch after washing and blocking. Adjust the tension dial in small increments—usually quarter-turns—until the fabric lies flat and matches your desired drape.
2. Choose the right yarn and needle bed
Not all yarns work well on every machine. Thin, slippery synthetics can slip out of the hooks, while thick, fuzzy wools can jam the mechanism. For custom sweaters, worsted weight acrylic or wool blends are generally the most reliable. Check your machine’s needle bed type: flat beds are great for panels, while circular machines are better for seamless tubes. Ensure the yarn feeds smoothly without snagging on the tension discs or carriage wheels.
3. Master the cast-on method
The cast-on determines the elasticity of your hem and necklines. For a stretchy hem that hugs the wrist or waist, use a long-tail cast-on or a knitted-on cast-on. These methods create a flexible edge that won’t bind. For a structured neckline or a rigid cuff, a standard cast-on with higher tension works better. Always test your cast-on on a small sample first to ensure it doesn’t roll or gap when stretched.
4. Check machine alignment and cleanliness
Dust and lint are the enemies of smooth knitting. Clean the needle bed and carriage wheels before every project. Check that the needles move freely up and down without sticking. If you are knitting a complex pattern, ensure the pattern carriage is aligned correctly with the main carriage. Misalignment can cause dropped stitches or uneven patterns that are difficult to fix later.
5. Knit a test swatch for gauge
Never skip the test swatch. Your gauge—the number of stitches and rows per inch—directly affects the final size of your sweater. A difference of just one stitch per inch can mean the difference between a fitted pullover and a boxy tunic. Knit a swatch at least 20cm square, wash it, and measure it. Use this gauge to calculate your stitch count for the body, sleeves, and yoke.
Tension is the most critical variable in machine knitting. If the tension is too tight, the fabric will pucker and shrink after washing. If it is too loose, the stitches will look sloppy and the garment may stretch out of shape. Start with the manufacturer’s recommended setting for your yarn weight, then knit a 10cm x 10cm swatch. Measure the swatch after washing and blocking. Adjust the tension dial in small increments—usually quarter-turns—until the fabric lies flat and matches your desired drape.
Not all yarns work well on every machine. Thin, slippery synthetics can slip out of the hooks, while thick, fuzzy wools can jam the mechanism. For custom sweaters, worsted weight acrylic or wool blends are generally the most reliable. Check your machine’s needle bed type: flat beds are great for panels, while circular machines are better for seamless tubes. Ensure the yarn feeds smoothly without snagging on the tension discs or carriage wheels.
The cast-on determines the elasticity of your hem and necklines. For a stretchy hem that hugs the wrist or waist, use a long-tail cast-on or a knitted-on cast-on. These methods create a flexible edge that won’t bind. For a structured neckline or a rigid cuff, a standard cast-on with higher tension works better. Always test your cast-on on a small sample first to ensure it doesn’t roll or gap when stretched.
Dust and lint are the enemies of smooth knitting. Clean the needle bed and carriage wheels before every project. Check that the needles move freely up and down without sticking. If you are knitting a complex pattern, ensure the pattern carriage is aligned correctly with the main carriage. Misalignment can cause dropped stitches or uneven patterns that are difficult to fix later.

Never skip the test swatch. Your gauge—the number of stitches and rows per inch—directly affects the final size of your sweater. A difference of just one stitch per inch can mean the difference between a fitted pullover and a boxy tunic. Knit a swatch at least 20cm square, wash it, and measure it. Use this gauge to calculate your stitch count for the body, sleeves, and yoke.
No comments yet. Be the first to share your thoughts!