
First Loops: Getting Started
Casting on is, without a doubt, the most important first step in any knitting project. It sets the foundation for everything that follows, determining the width of your work and the look of the finished edge. It’s also frequently the most intimidating part for beginners, but don’t let that scare you. We're going to break down several methods to help you find one that feels comfortable.
It will feel awkward at first. Your fingers will fumble, the yarn might slip, and you'll probably undo it a few times – maybe a lot of times. This is perfectly normal. Knitting, like any craft, requires muscle memory, and building that takes time and practice. The goal is to build confidence, one loop at a time.
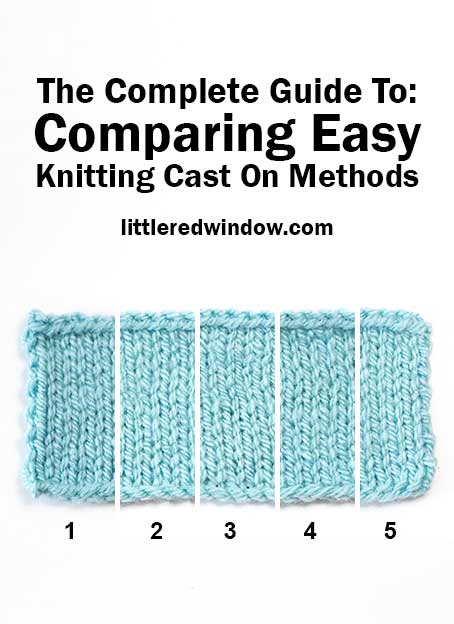
In this guide, we’ll explore four popular cast-on methods: the long-tail cast on, the simplified cast on, the cable cast on, and a look at some less common options. Each has its strengths and weaknesses, and the best method for you will depend on the specific project and your personal preference.
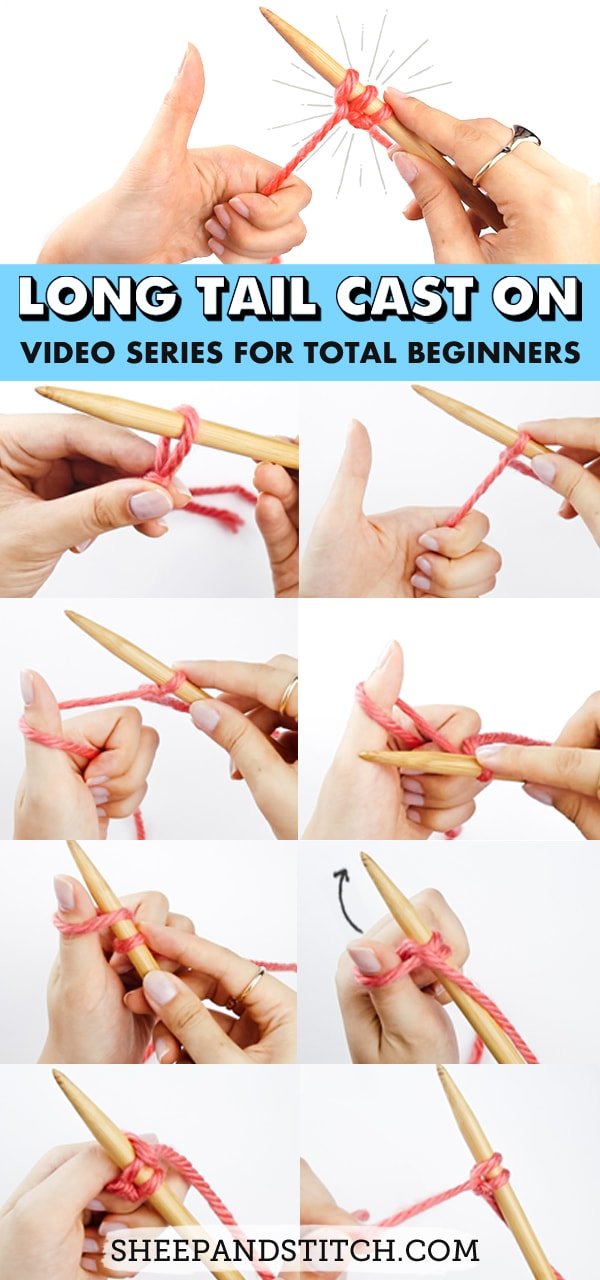
The Long-Tail Cast On: A Solid Foundation
The long-tail cast on is arguably the most popular method, and for good reason. It’s versatile, creates a neat and tidy edge, and works well with most yarn weights. It's a great all-around choice for beginners, and the method both nimble-needles.com and instructables.com recommend as a starting point.
Here’s how to do it: First, estimate how much yarn you’ll need. A general rule of thumb is to allow about 1 inch of yarn per stitch. It’s always better to overestimate than underestimate! Create a slip knot, leaving a long tail of yarn – this is where the name "long-tail" comes from. Wrap the yarn around your fingers the way you normally would when preparing to knit.
Insert the needle through the front loop from left to right. Bring the yarn forward and around the needle, then back to the starting point. Insert the needle into the loop on your thumb, pick up the yarn from your index finger, and pull it through the thumb loop. This creates your first stitch. Repeat these steps to create the desired number of stitches. Keep an eye on your tension; you want the stitches to be snug but not too tight.
Common mistakes include creating stitches that are too tight, making it difficult to knit into them, or making them too loose, resulting in a flimsy edge. If your stitches are too tight, try using larger needles or loosening your grip on the yarn. If they’re too loose, tighten your grip and practice maintaining consistent tension. It takes practice, but you'll get there.
- Estimate yarn length (1 inch per stitch)
- Create a slip knot
- Wrap yarn around fingers
- Insert needle through front loop
- Repeat to create desired number of stitches
Simplified Cast On: Quick and Easy
The simplified cast on is a faster method than the long-tail cast on, making it a good option for projects where the cast-on edge isn’t as prominent. It’s a bit less polished looking, but it gets the job done quickly. This method is particularly useful if you're short on time or want a more relaxed approach.
The main difference between this method and the long-tail cast on is that you don’t need to estimate and leave a long yarn tail. Instead, you work directly from the ball of yarn. Essentially, you're creating a loop on the needle with each stitch, rather than building from a pre-made tail.
Maintaining even tension with the simplified cast on can be trickier than with the long-tail method. Focus on keeping your yarn handling consistent and avoiding jerky movements. It's easy to end up with a very loose or very tight edge if you're not careful. Practice makes perfect, so don't be discouraged if your first attempts aren’t perfect.
- Faster than long-tail cast on
- Works directly from the ball of yarn
- Requires consistent yarn handling
Cable Cast On: A Sturdy Edge
The cable cast on, as seen frequently on Instagram, is known for creating a neat, sturdy edge that's ideal for projects like scarves, blankets, or anything where you want a defined border. It’s a bit more involved than the previous methods, but the resulting edge is worth the extra effort.
This method involves holding the yarn in your left hand and using the needle to create a loop around both the yarn and the needle. It’s similar to a knitted stitch, which is why it produces a firm, well-defined edge. The key is to keep the cast-on edge consistent in tension.
Pay close attention to how you hold the yarn and insert the needle. Maintaining even tension is crucial for a clean look. It might take a few tries to get the hang of it, but once you do, you’ll appreciate the professional finish this cast-on method provides.
Tension Troubles: Diagnosing and Fixing
Uneven tension is a very common problem for beginners, and even experienced knitters occasionally struggle with it. Too tight, too loose, or inconsistent tension can all affect the look and feel of your finished project. Diagnosing the cause is the first step to fixing it.
If your stitches are too tight, it will be difficult to knit into them, and your fabric will be stiff and unforgiving. Try using larger needles, loosening your grip on the yarn, or consciously slowing down your movements. If your stitches are too loose, your fabric will be floppy and gappy. Tighten your grip, try smaller needles, and focus on maintaining consistent tension as you work.
I spent a long time struggling with tension myself. What finally clicked for me was focusing on keeping my yarn handling relaxed and consistent. I also experimented with different needle materials – wood, bamboo, and metal – and found that bamboo gave me the best control. Adjusting your grip and yarn handling are the most impactful adjustments you can make.
Beyond the Basics: Less Common Methods
While the methods we’ve covered are the most popular, there are many other cast-on techniques out there. The German twisted cast on creates a very elastic edge, making it suitable for socks or ribbing. The knitted cast on, as the name suggests, is created using a knitting motion and results in a firm, decorative edge.
These methods are useful for specific projects or when a particular look is desired, but they’re not essential for beginners to master. It’s good to know they exist, but don’t feel pressured to learn them all at once. Focus on solidifying your skills with the foundational methods first.
Resources like websites and YouTube channels dedicated to knitting will have tutorials on these more advanced techniques. Exploring these options can open up a whole new world of possibilities as you become more confident in your knitting.
Learning Resources: Where to Find Help
There’s a wealth of information available to help you learn to cast on. YouTube is a fantastic resource, with countless tutorials demonstrating different methods. The LEARN TO KNIT IN 2026! video is a particularly good starting point, offering a comprehensive overview of the basics.
Websites like nimble-needles.com and instructables.com provide detailed written instructions and helpful diagrams. Online knitting communities, such as Ravelry, are a great place to ask questions and get advice from experienced knitters. Local yarn stores often offer classes and workshops, providing in-person instruction and a supportive learning environment.
Don't underestimate the value of hands-on learning. A local yarn store can provide personalized guidance and help you choose the right materials for your projects. Knitting classes are a great way to meet other knitters and learn new techniques in a structured setting.
Learning Resources for Casting On Knitting
| Resource Type | Cost | Skill Level | Pros | Cons |
|---|---|---|---|---|
| YouTube | Generally Free | Beginner to Intermediate | Visual learning; wide variety of techniques demonstrated; can pause and rewind; access to many different instructors. | Can be overwhelming with choices; quality varies; lacks interactive feedback. |
| Websites (e.g., Knit Fluent, nimble-needles.com) | Generally Free to Low Cost | Beginner to Advanced | Detailed written instructions often accompanied by photos; easily searchable; access to a broad range of techniques and patterns. | Requires self-discipline; can be harder to understand without visual demonstration; may contain outdated information. |
| Local Yarn Stores (LYS) | Moderate to High (class fees, materials) | Beginner to Advanced | In-person instruction; personalized feedback; community aspect; opportunity to handle materials. | Cost can be a barrier; class schedules may be limited; travel required. |
| Online Knitting Communities (e.g., Ravelry) | Typically Free to Low Cost (premium features may exist) | Beginner to Advanced | Supportive community; opportunity to ask questions; access to a wealth of knowledge and shared experiences; pattern databases. | Information quality varies; can be time-consuming to navigate; relies on self-direction. |
| Online Knitting Classes (e.g., Skillshare, Creativebug) | Subscription Based | Beginner to Advanced | Structured learning; often includes downloadable resources; access to expert instruction. | Requires a paid subscription; pace may not suit all learners; less personalized than in-person classes. |
| Books/Print Resources | Moderate (cost of book) | Beginner to Advanced | Portable; comprehensive; often includes patterns and diagrams. | Static medium; can be harder to follow visual instructions compared to video. |
Qualitative comparison based on the article research brief. Confirm current product details in the official docs before making implementation choices.
Practice Makes Progress
Mastering casting on, like any skill, takes practice. Don’t be afraid to experiment with different methods and find what works best for you. Start with small practice projects – a simple garter stitch swatch, a dishcloth, or a small square – to build your confidence.
And most importantly, don’t be afraid to frog (rip out) your work and start over. It’s all part of the learning process. Everyone makes mistakes, even experienced knitters. The key is to learn from those mistakes and keep practicing.
Remember that consistency is key. The more you practice, the more natural and fluid your movements will become. Soon, casting on will become second nature, and you’ll be able to start your knitting projects with confidence. Enjoy the journey!


No comments yet. Be the first to share your thoughts!